Confession time:
I don’t like waterfalls.
Yep. You heard that right. Whereas many hikers flock to waterfalls and feel some inexplicable (from my POV) connection to the things, I often find myself walking right on by to leave it to the crowds. Very rarely do I encounter a waterfall hike and think, “Well, I’ll be better off hiking this than some other hike.” But then again, most waterfalls aren’t Yosemite Falls. And fortunately, I can tell you that this hike more than lives up to the hype. It hasn’t changed my mind about waterfalls in general (they’re. . . . fine), but there is so much grandeur, scenery, and simple, jaw-dropping awe on this hike, that even without the waterfall, it’s a world-class experience. (But yeah, the waterfall is cool).

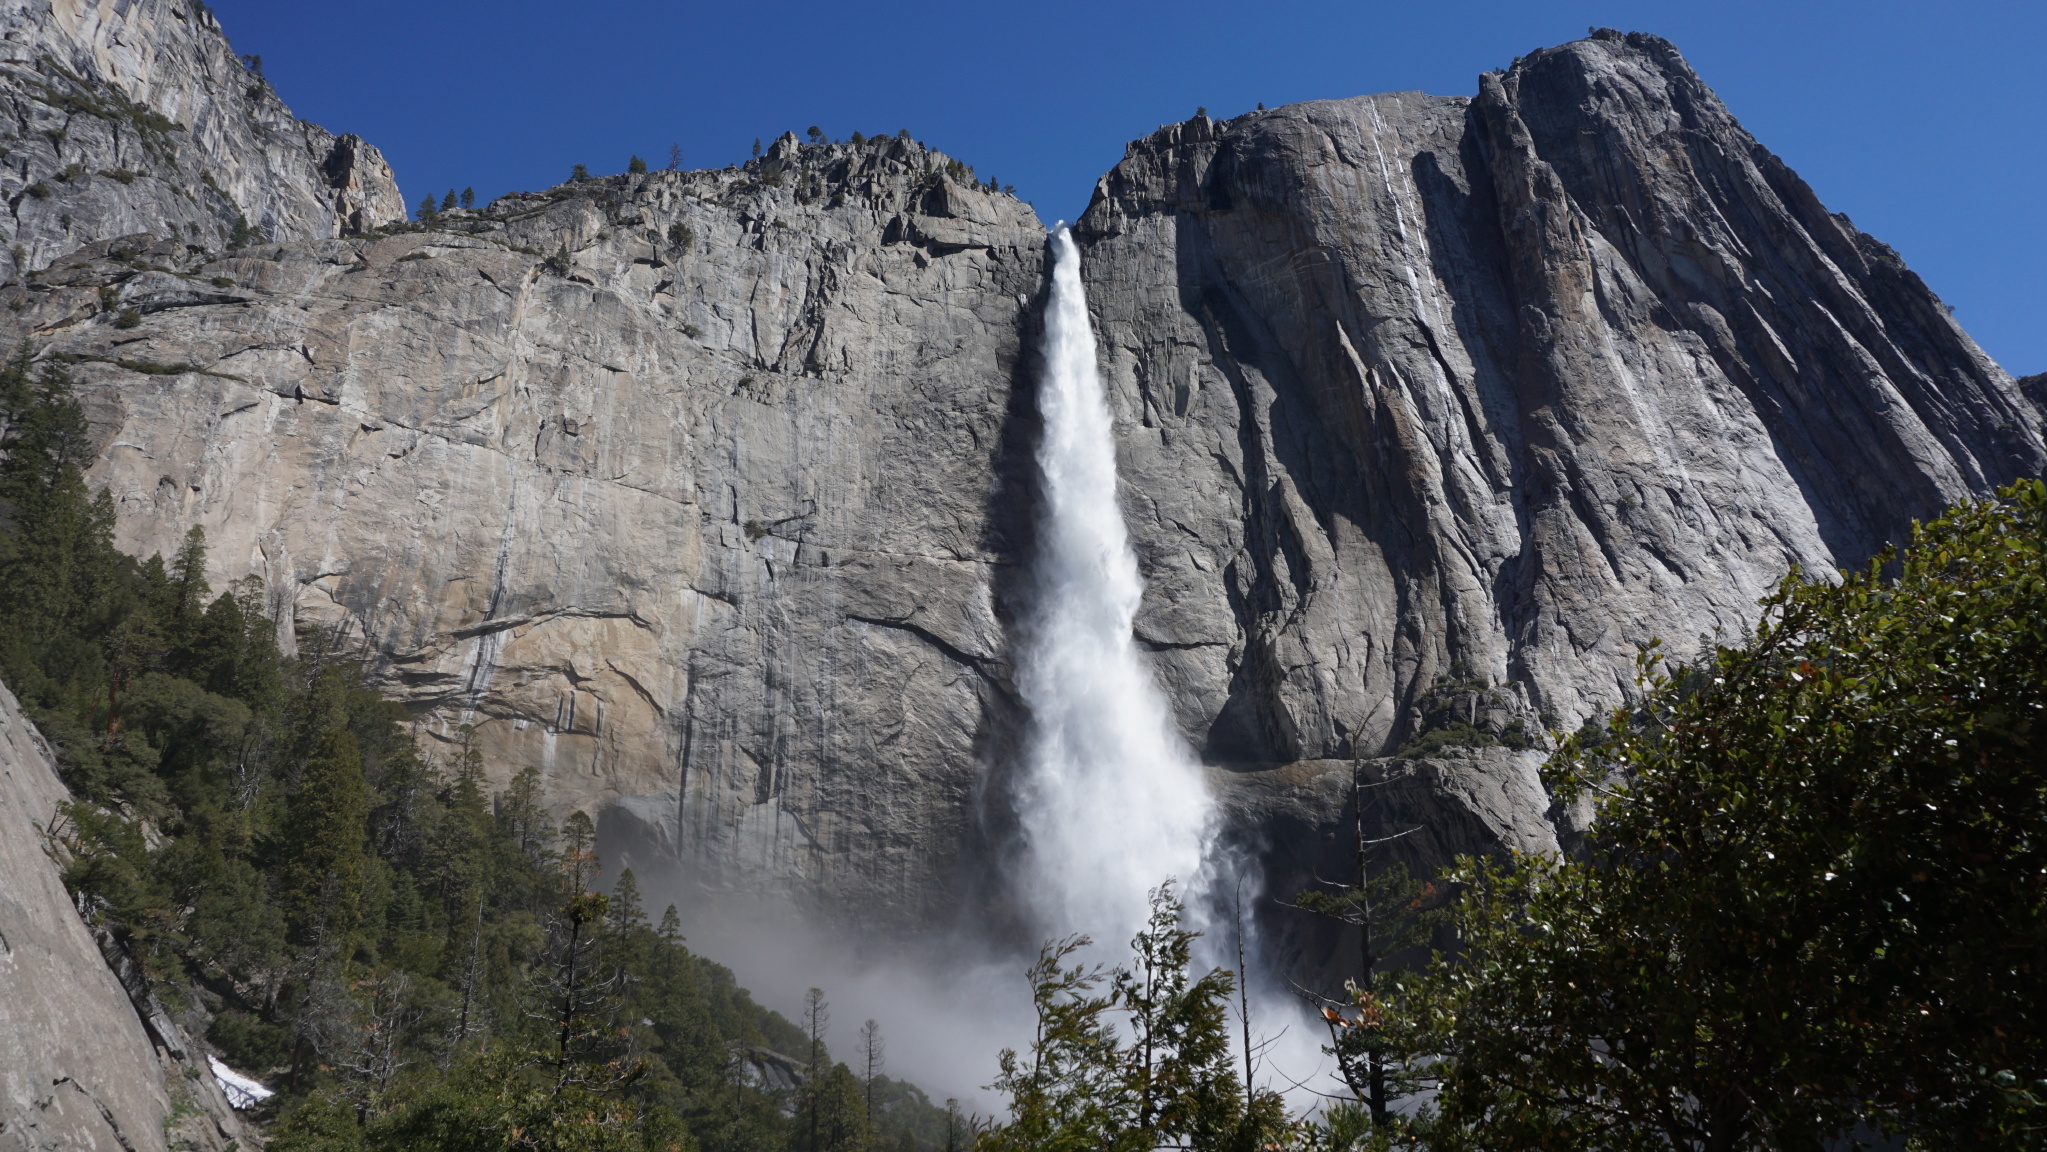
If you don’t know already, Yosemite Falls is the tallest waterfall in Yosemite National Park, and it’s also the tallest waterfall in California. Worldwide, the falls clock in at #20. The falls are divided into three distinct sections – Upper, Middle, and Lower – as they spill over the sheer northern wall of Yosemite Valley into a series of cascades before the Lower Falls finally reach the valley floor. Within Yosemite Valley, they are second only to Half Dome in terms of blindingly obvious/immediately recognizable landmarks, and for many people the site of the falls and this hike in particular are in the top 5 as far as essential Yosemite hiking experiences go.
Red Tape
You can hike this route as a challenging backpacking trip. In order to do so, you’ll need to secure a wilderness permit from the Yosemite Valley Wilderness Center. Within the shoulder seasons (Spring and Fall), you may be able to pick up a walk-up permit from the center. However, during the busy late spring and summer season, your best hope is through reservations. You can reserve your permit by filling out the Wilderness Permit Request found on the Yosemite Conservancy’s website. The Conservancy handles the reservation process, and when they approve your permit, they send a confirmation email. You then bring that email to the wilderness center, and rangers will issue your permit after filling you in on crucial Leave No Trace principles and backcountry regulations. Note that you will also need an approved bear canister. If you don’t own one, the rangers will rent you one.
Safety
Food storage is always a major safety concern in Yosemite Valley. Black bears are accomplished thieves with prodigious olfactory prowess who crave infinite calories. Our calorie-laden food is a temptation too great for a bear to resist. If they can get to your food (and they will unless you store it correctly), bears will often attempt to get more and more human food, which habituates them to humans and makes them dangerous. Failing to store your food in the food storage lockers at the trail’s parking area or storing your food overnight in a bear canister could lead to a fed bear becoming dangerous, which in turn leads to the fed bear becoming a dead bear.
The Upper Yosemite Falls Trail ascends the north face of Yosemite Valley, which receives direct sun exposure over much of the hike. During the spring, this won’t be much of a problem, as temperatures in the valley are usually pretty mild at that time. However, in summer, valley temperatures can reach the mid-90’s, and a steep climb on exposed trail under those temperatures exposes hikers to heat-related issues. Your best bet for avoiding these heat-related issues is to start early – like ass crack of dawn early. The earlier you start, the less exposed you are to sunlight, especially on the grueling final set of switchbacks (more on those fun times soon).
This is a very challenging hike, as you can tell from the hike stats. It’s not a great idea for an unprepared hiker to take this hike on, especially if you’re wearing shoes with poor tread, or your fitness level isn’t great. I saw a number of people fall down because they were wearing casual street shoes. I also saw a lot of hikers who were not prepared for the rigors of this trail, and they were clearly struggling, even suffering. If you don’t have the requisite fitness, consider visiting the Lower Yosemite Falls Trail. It’s short, accessible, and still gives you a good taste of the waterfall experience.

The views from Yosemite Point are just stupid.
Useful Information
Yosemite Creek, which feeds Yosemite Falls, runs between November and late July of most years. This means that, during Yosemite’s peak season, the falls may run dry. This may put a damper on your hike, but rest assured that the scenic features on this hike are far greater than Yosemite Falls itself.
If you don’t want to get caught in the horrifying summertime traffic SNAFU’s within Yosemite Valley, consider utilizing the Yosemite Shuttle System within valley, and consider utilizing YARTS to reach the valley itself. Both features reduce vehicle traffic, and even if they aren’t the most comfortable ways to get around, you’ll be sparing yourself the possibility of experiencing a two hour summer traffic jam if you’re visiting in peak season.
If you have to drive, consider arriving as early as possible. Before dawn, it is extremely easy to find parking in Yosemite Valley. Pre-dawn starts also help mitigate heat related issues.
The Hike
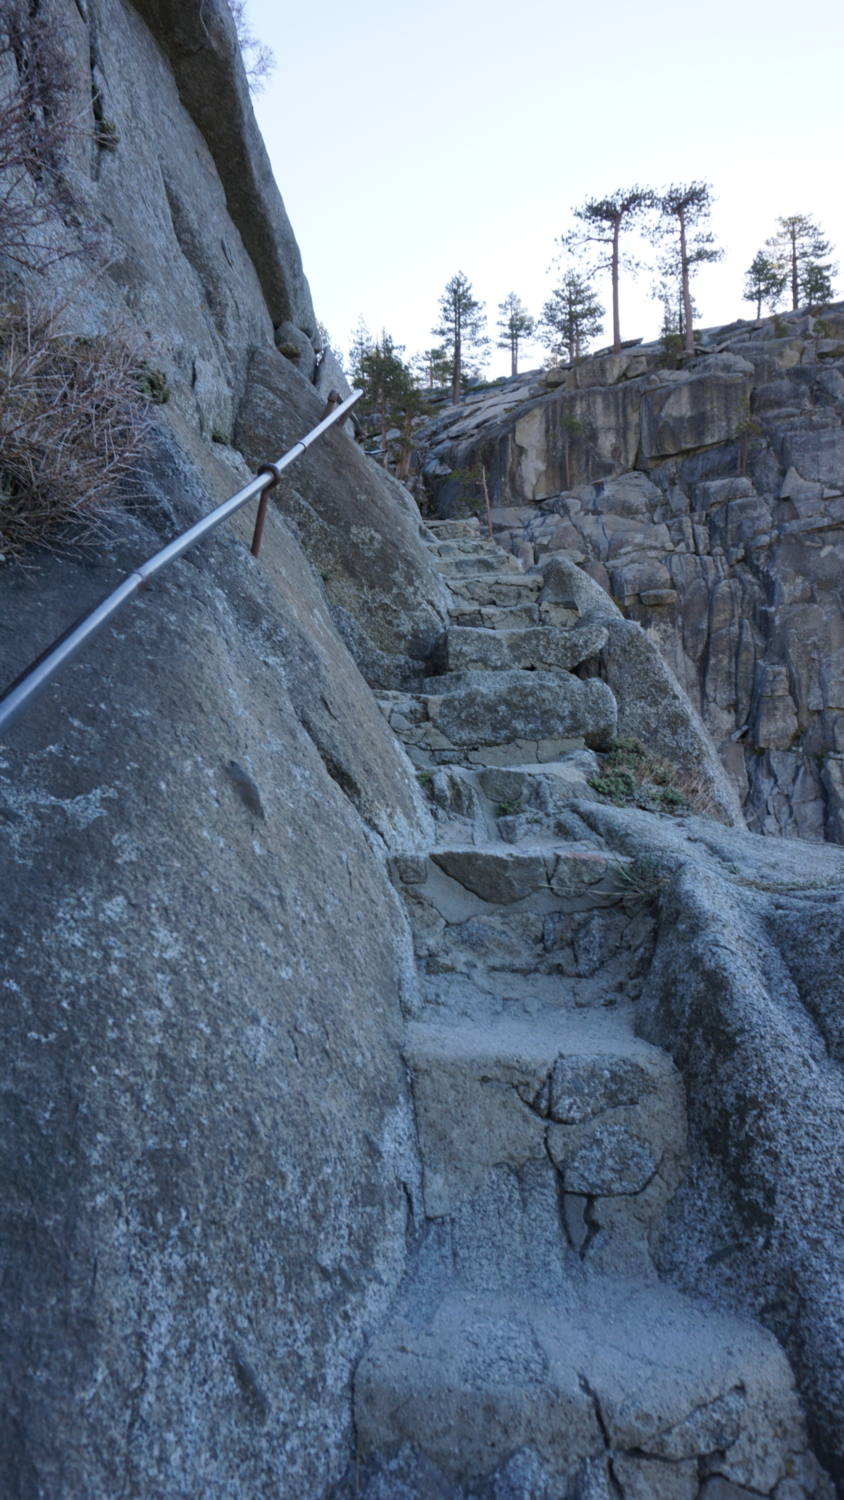
From the Upper Yosemite Falls parking area, cross Northside Drive to reach the Camp 4 parking area. Walk to the northwest corner of the parking area to find the beginning of the Upper Yosemite Falls Trail, as indicated by a trailhead sign. From there, walk straight ahead to the first of many, many, many switchbacks. Right off the bat, the trail puts you to work, and you’ll pick up 600 feet of elevation over the first 0.6 mile of climbing. This section is heavily shaded by canyon live oaks and the occasional bay laurel, which helps stave off heat to some degree. Count those blessings, as future sections of the trail won’t afford that luxury.

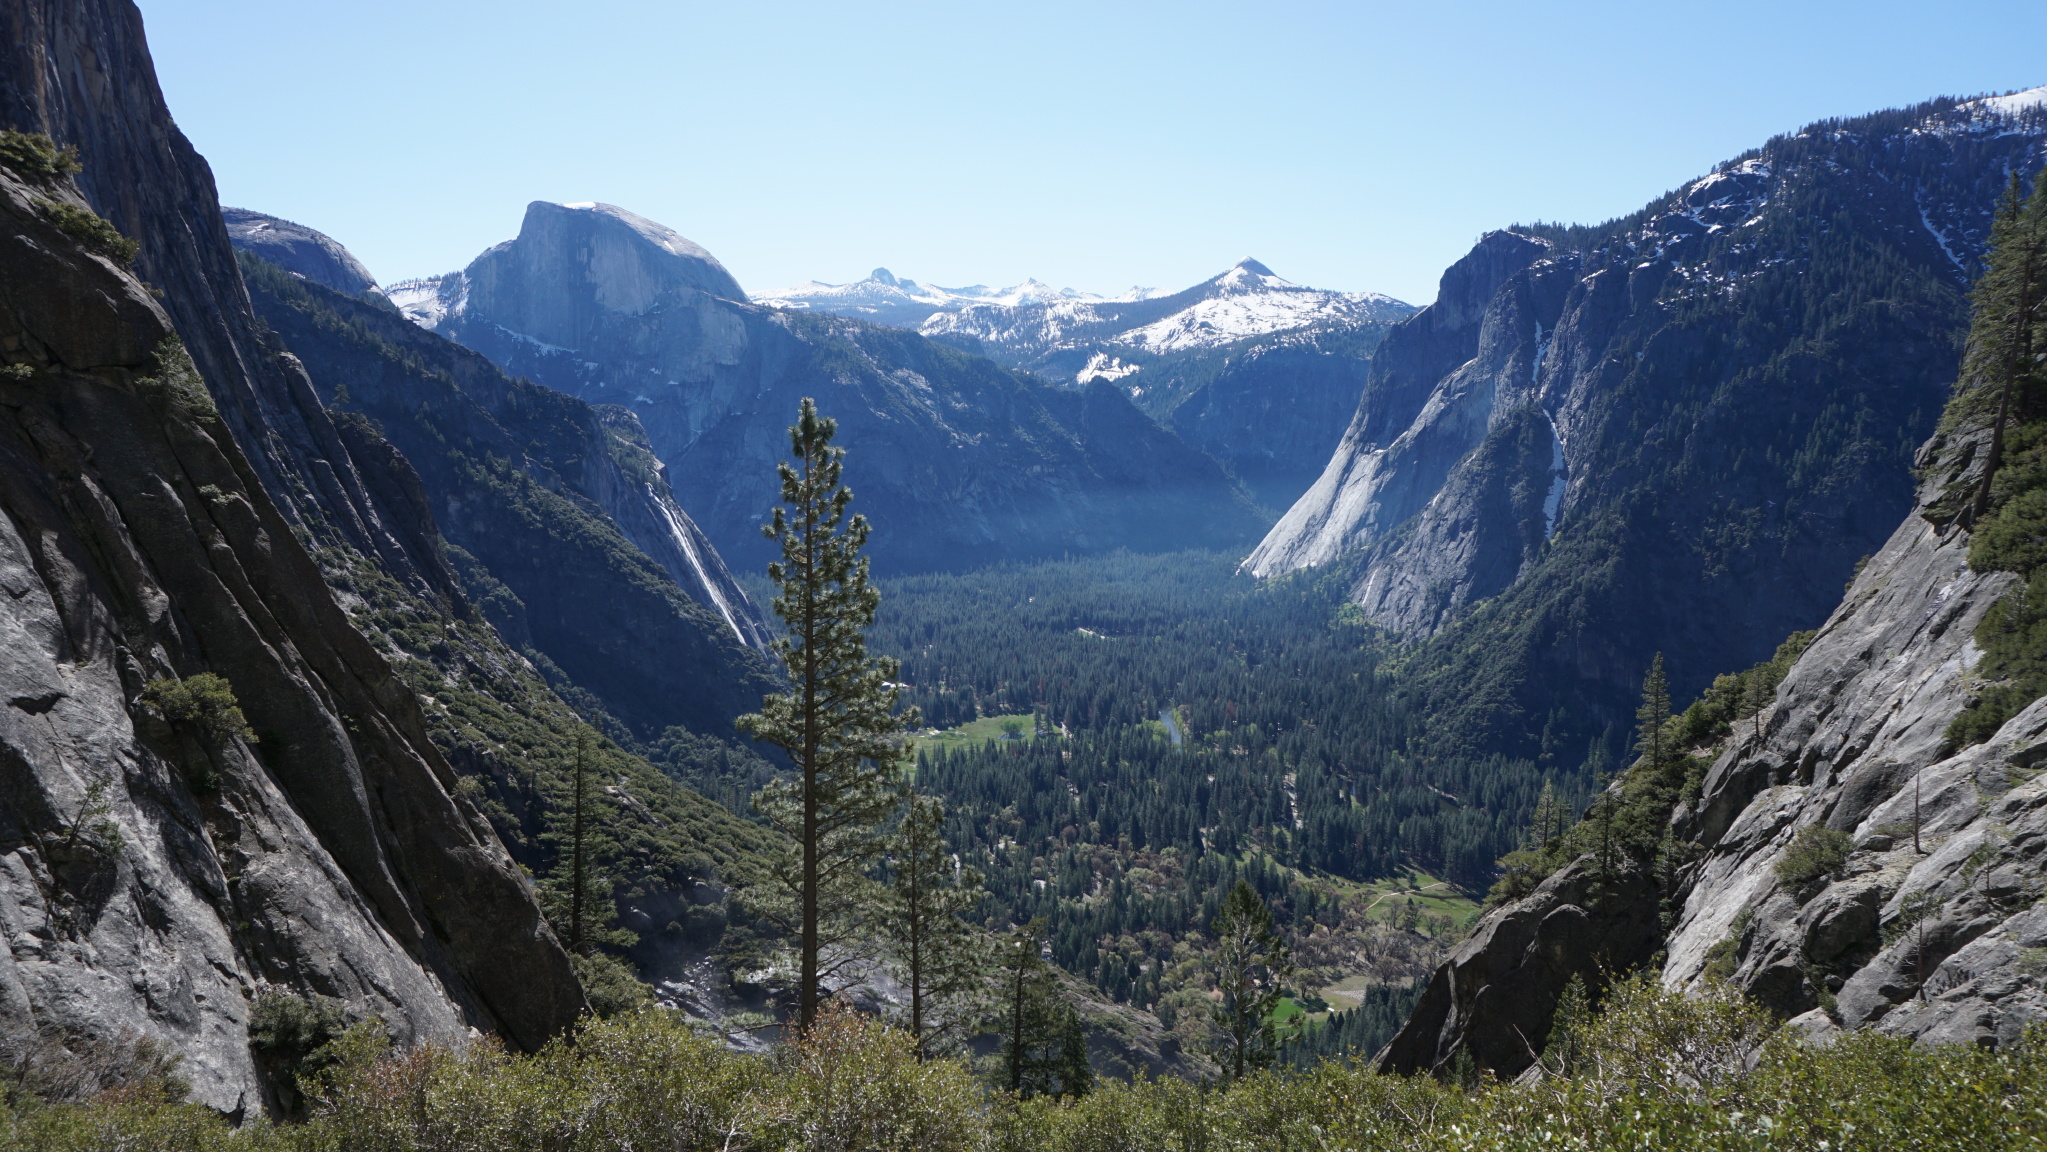
Looking east from Columbia Rock
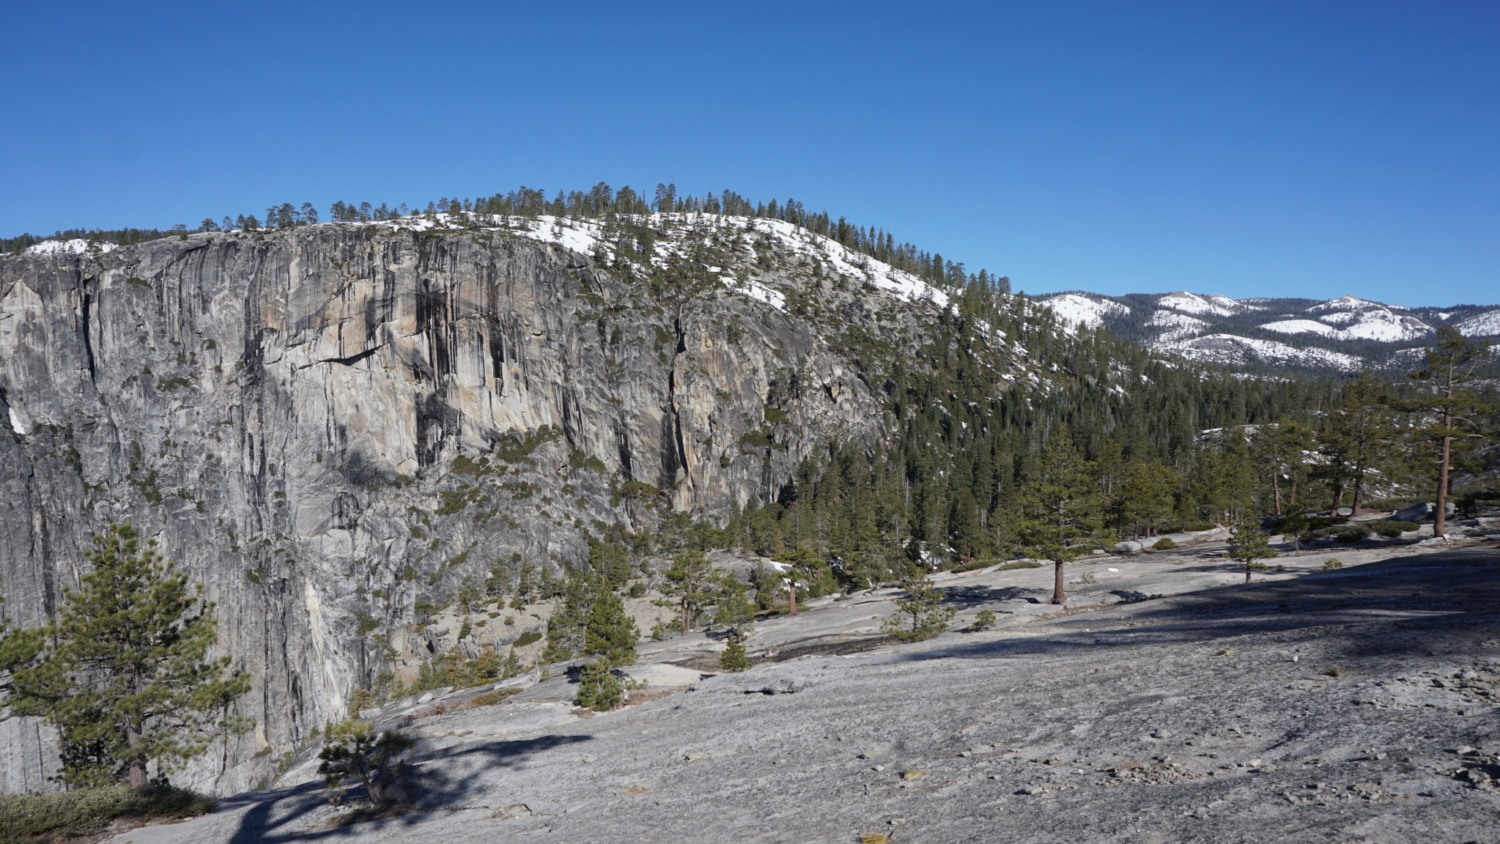
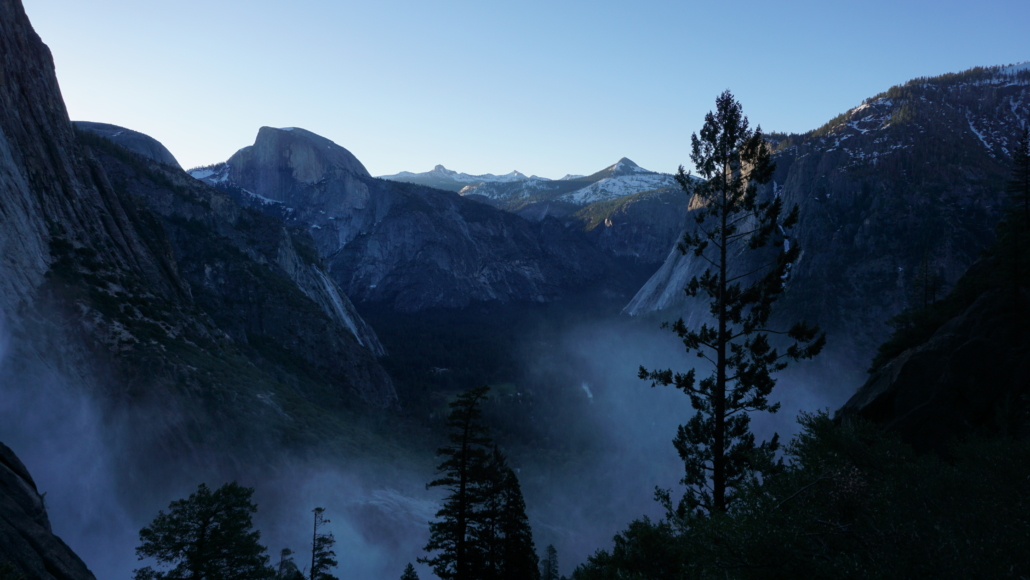
At the end of the switchbacks, the trail straightens out, but continues to climb for another 0.2 mile. At 0.8 mile, begin another set of switchbacks that, after another 1,000’/0.1 mile grade will deposit you at the base of Columbia Rock. Columbia Rock features a stellar view of the east half of Yosemite Valley. Even if you were to call it a day right here and go no further, you’d still be scoring world-class views. However, this is just the beginning.

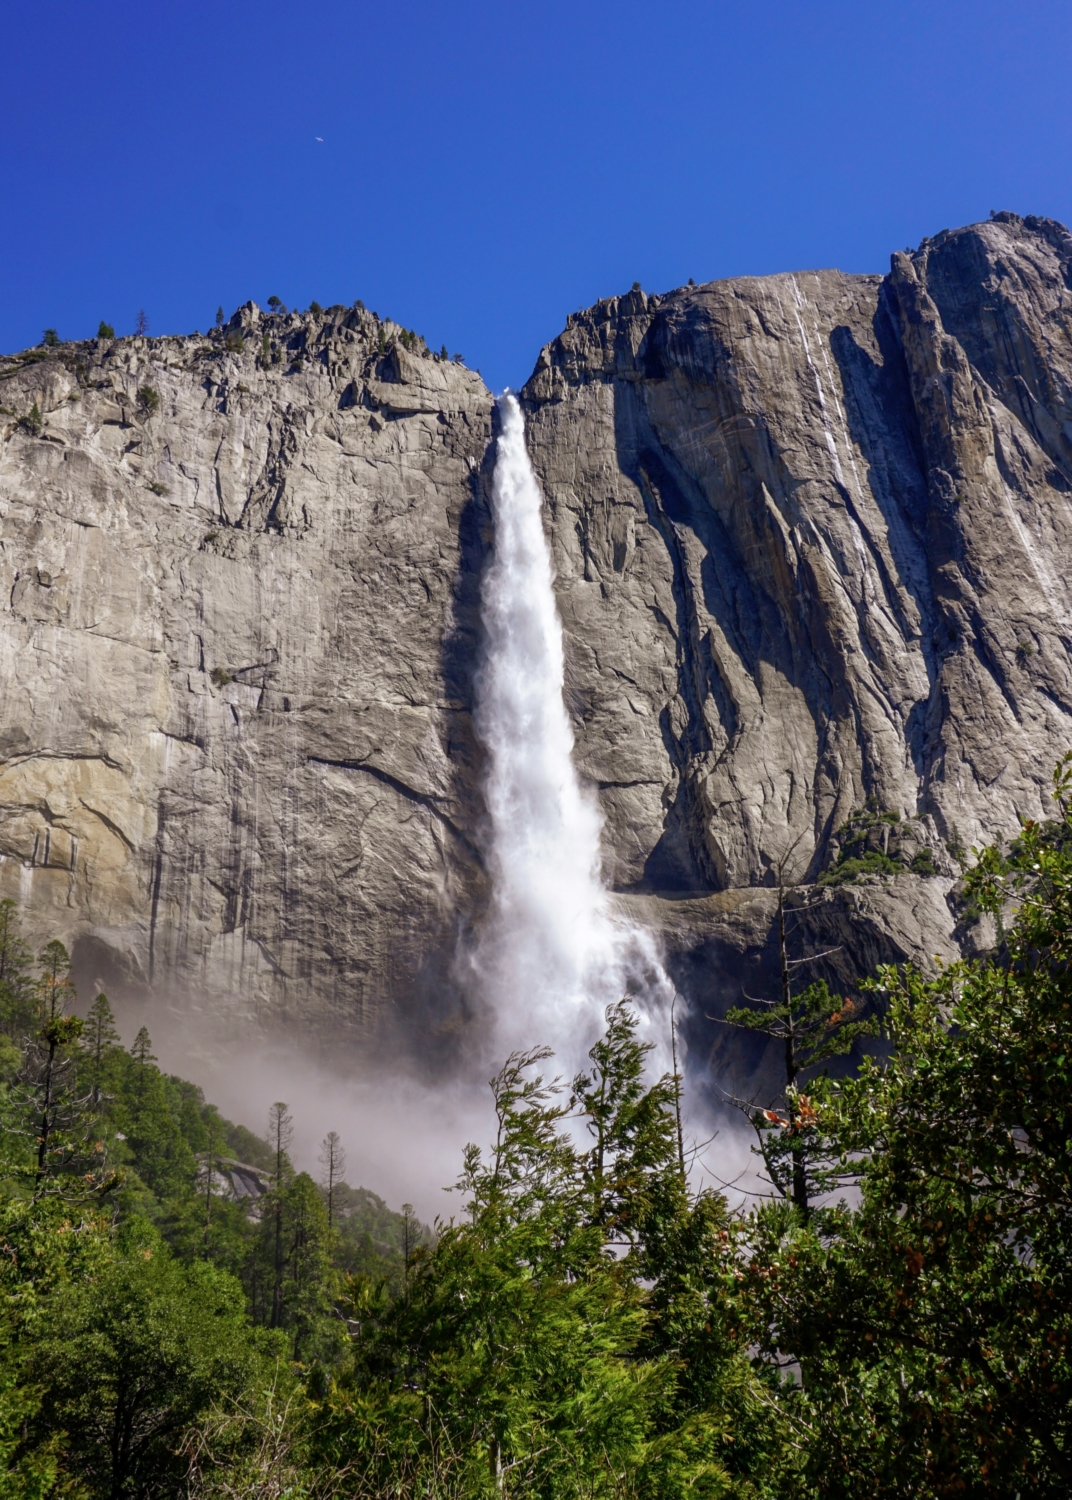
The trail makes a short, but ridiculously steep climb away from Columbia Rock before it levels out for a welcome reprieve. As you round a bend around the 1.2 mile mark, Upper Yosemite Fall greets you in its full, thundering splendor. The falls kick up prodigious mist during peak season (late May, typically), and you might get hit with some of that mist even though the falls are still nearly half a mile away. As you follow the trail on a bend to the north, the mist may start soaking through your clothes and gear. This will be welcome on a hot summer day, but if you’re hiking on a cool April morning, you may want to throw on a rain poncho.
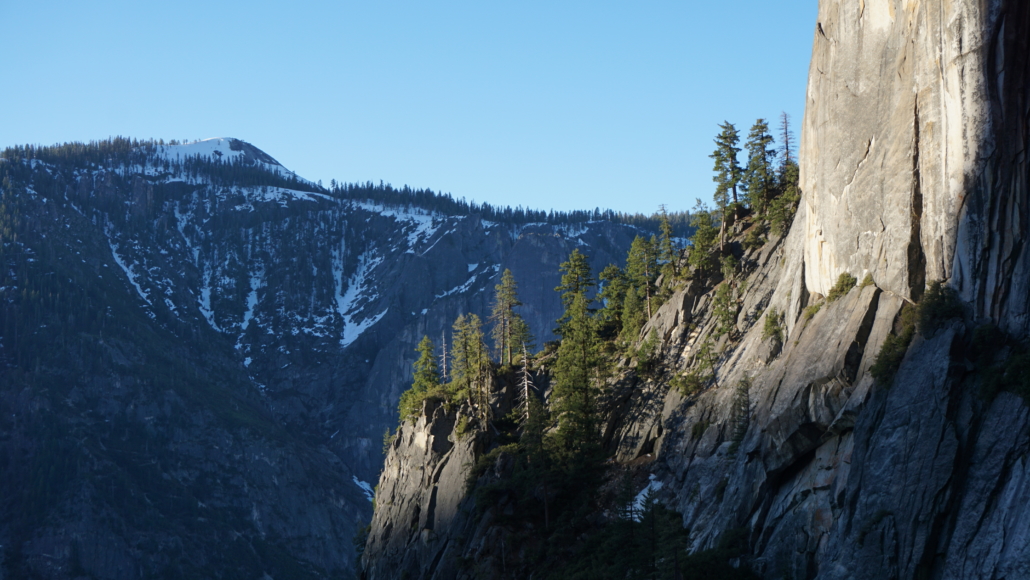
Meanwhile, the trail drops 200 feet of elevation as you traverse the upper wall of Lower Yosemite Fall’s massive grotto (yes, you’ll have to re-gain that elevation later). The trail resumes its climb through a heavily wooded slope only a few football fields away from the falls. At this close proximity, the sound from the falls is deafening, and the mist kicked up is absolutely saturating. The mist actually helps nourish a relatively dense forest on this slope, and you’ll switchback your way through cedars, Douglas firs, and bigleaf maples as you climb toward the final and most grueling segment of the route. Several of the switchbacks feature great views of the falls, and this is about as close as you can get to them via safe, established routes.

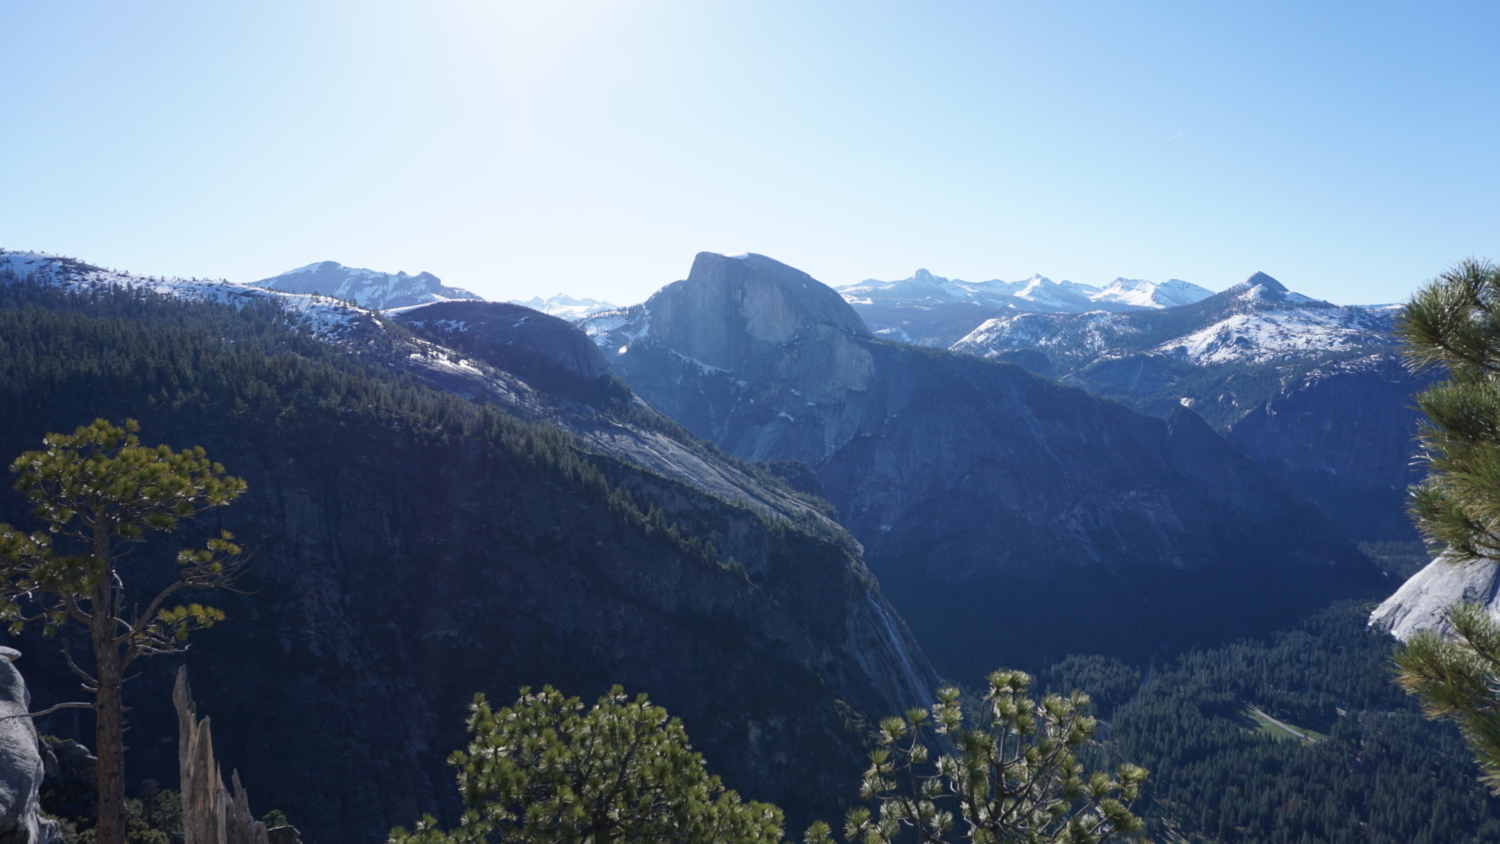
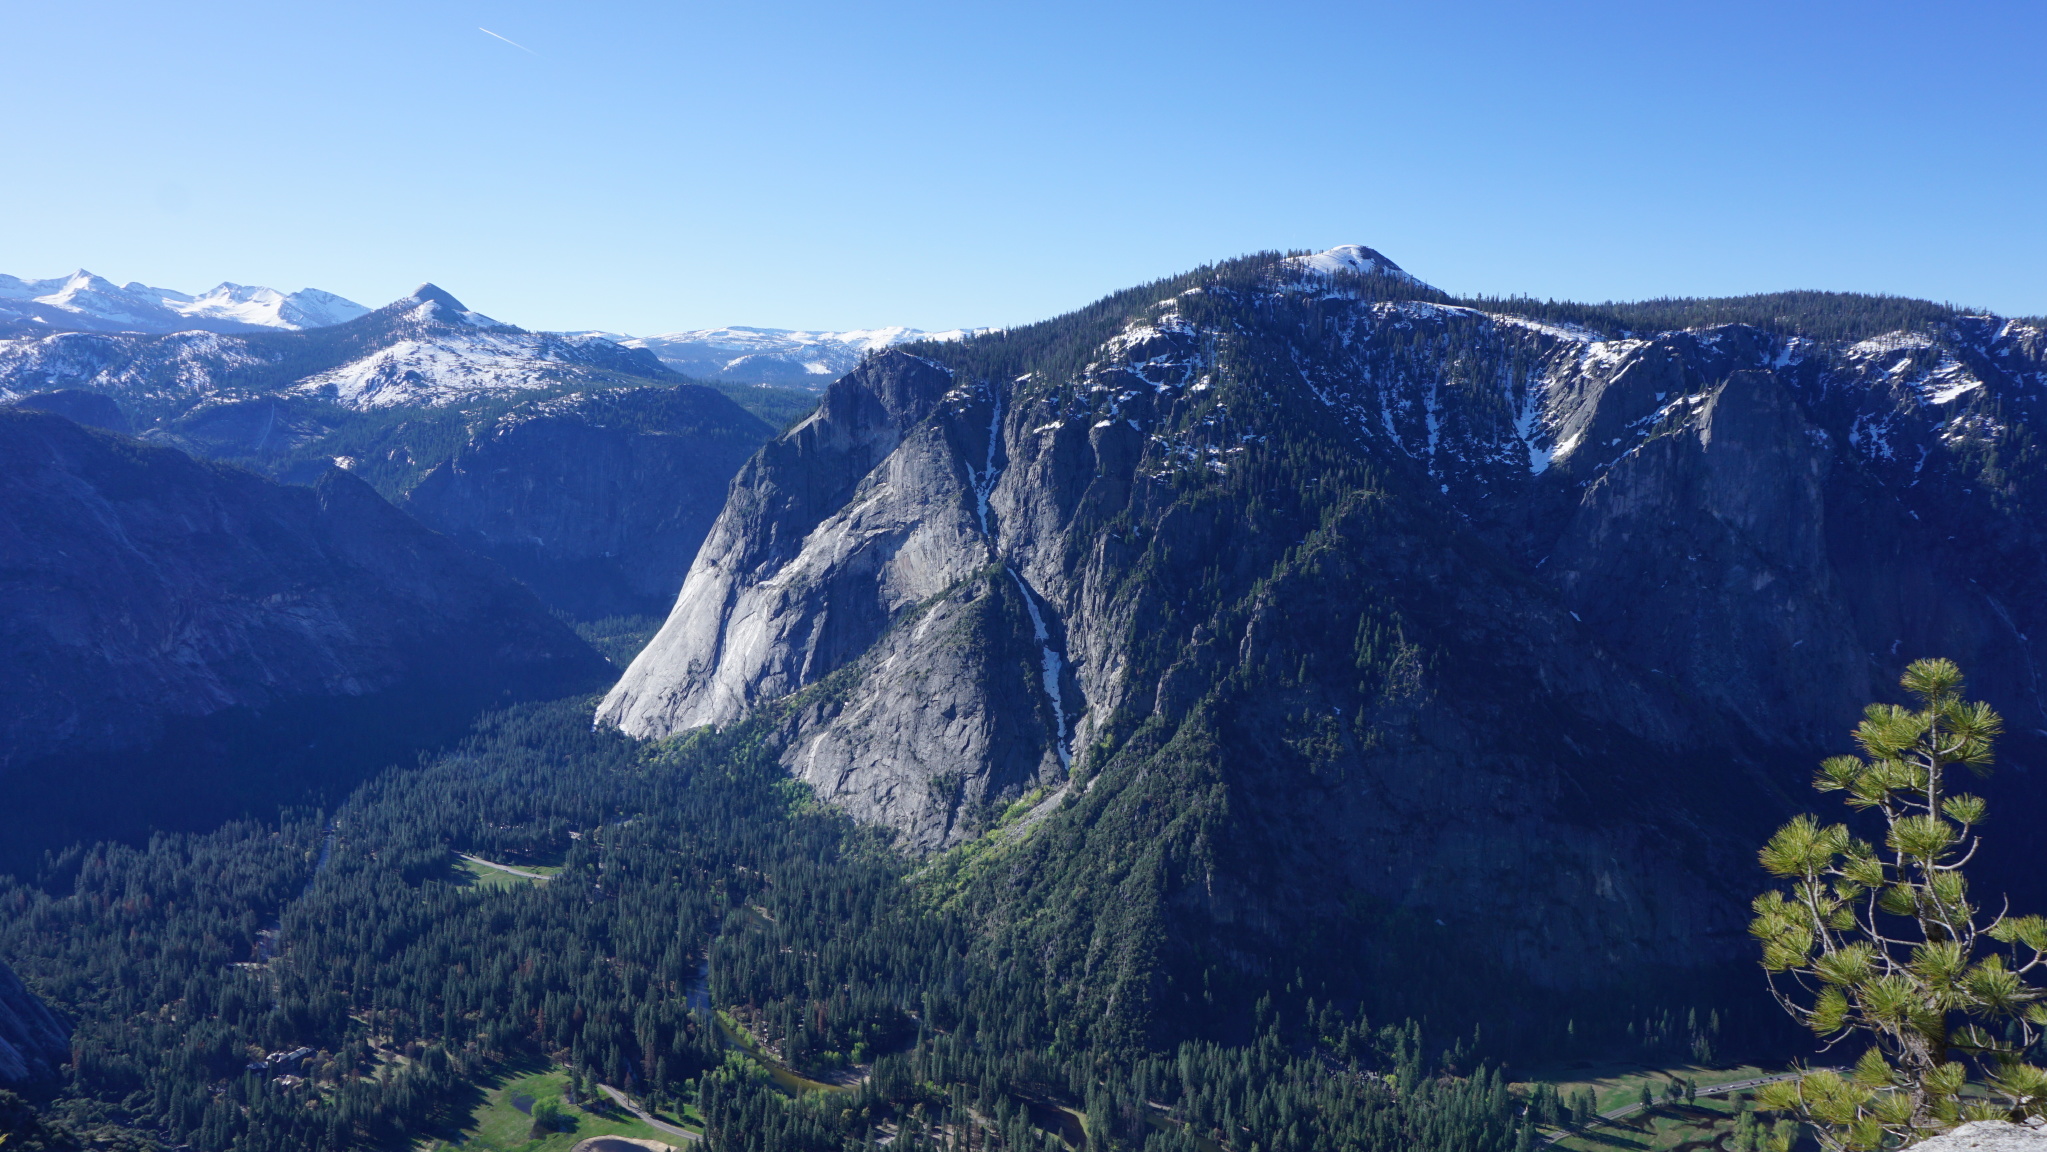
Mt. Starr King (left) and Glacier Point (right)
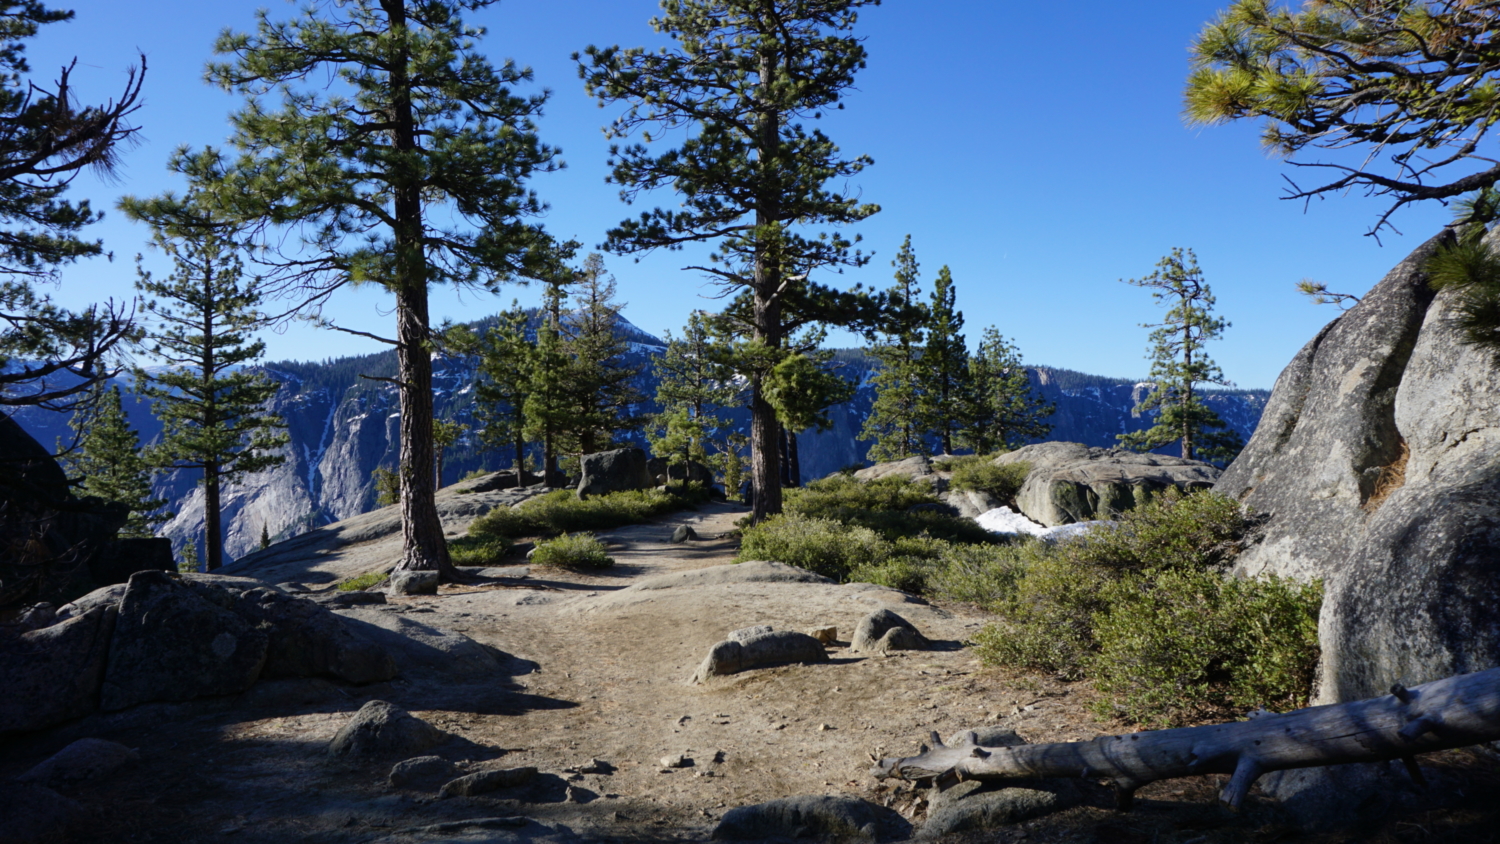
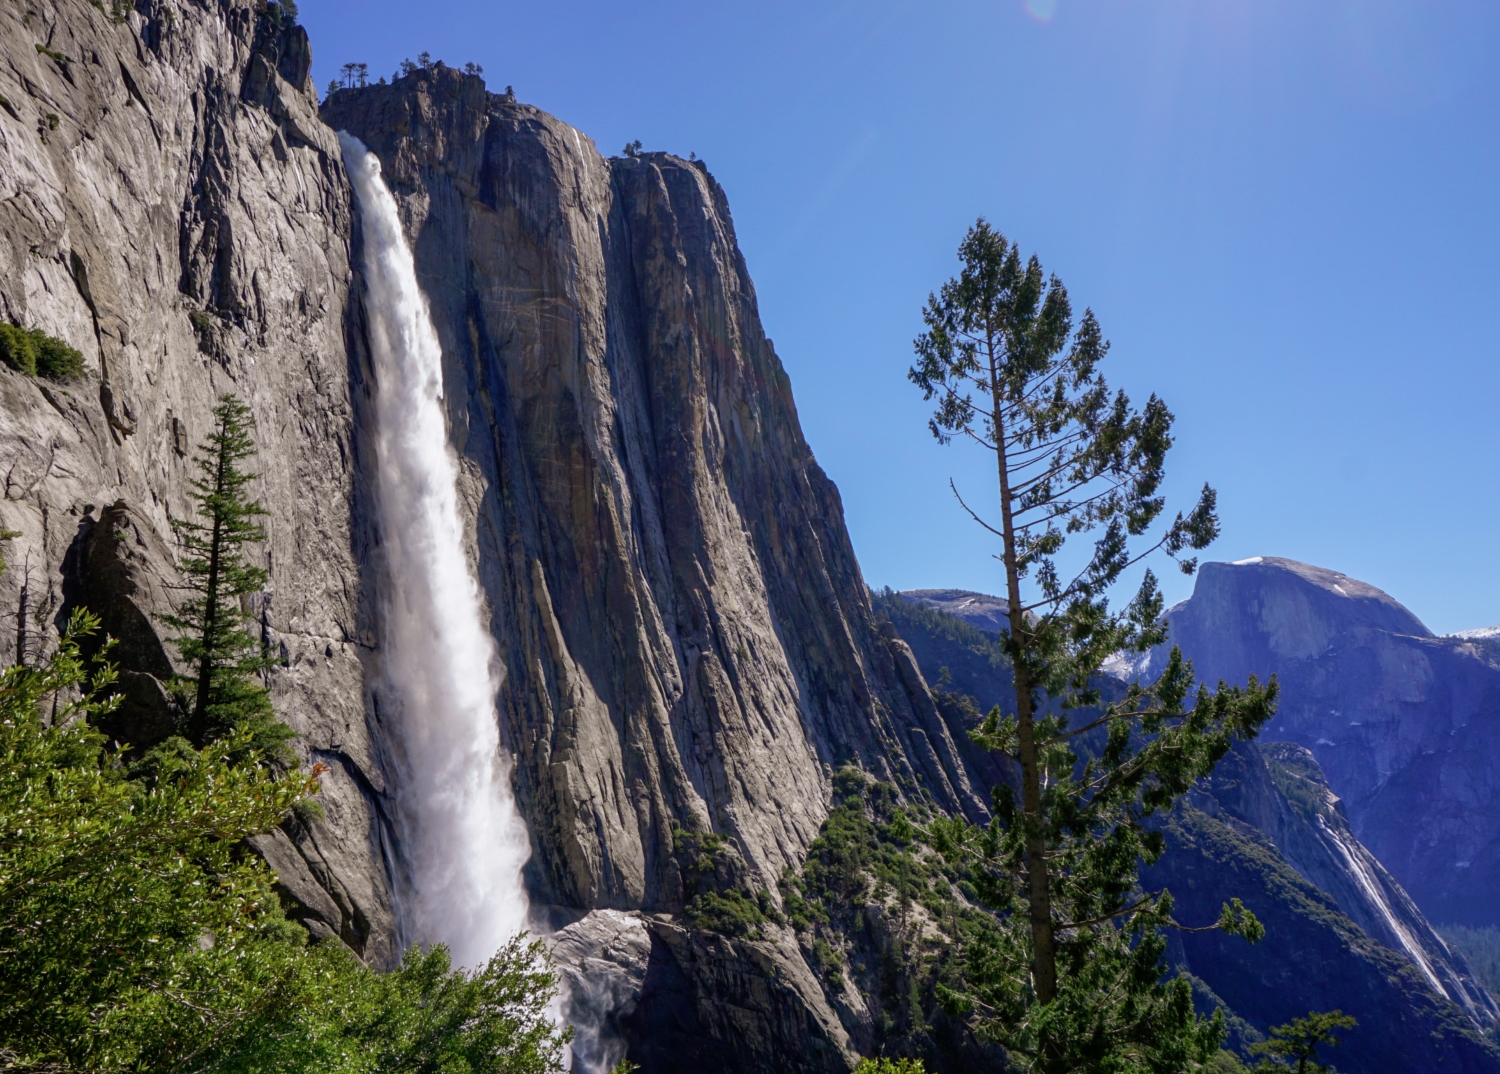
At 1.85 miles, the trail pulls away from the waterfall into a ravine separated from the waterfall by a broad ridge. The sound of the falls pretty much disappears, leaving you to tackle a fairly grueling section of trail in relative silence. Over the next 0.8 mile, you will gain 1,200′ on a dusty, mostly exposed section of trail. This is hiking at its most grueling, and if you didn’t get an early start, you may be cursing the sun for blasting you with heat as you grind your way up the slope. However, at 2.65 miles, the ordeal comes to an end as you reach a junction where the Yosemite Creek Trail and Yosemite Point Trails diverge. Turn right at this junction and make one last short climb to another junction at 2.7 miles signed for a spur trail leading to an overlook for Upper Yosemite Falls. Turn right here, and follow the flat trail through beautiful, sparse forest to the rim of Yosemite Valley.

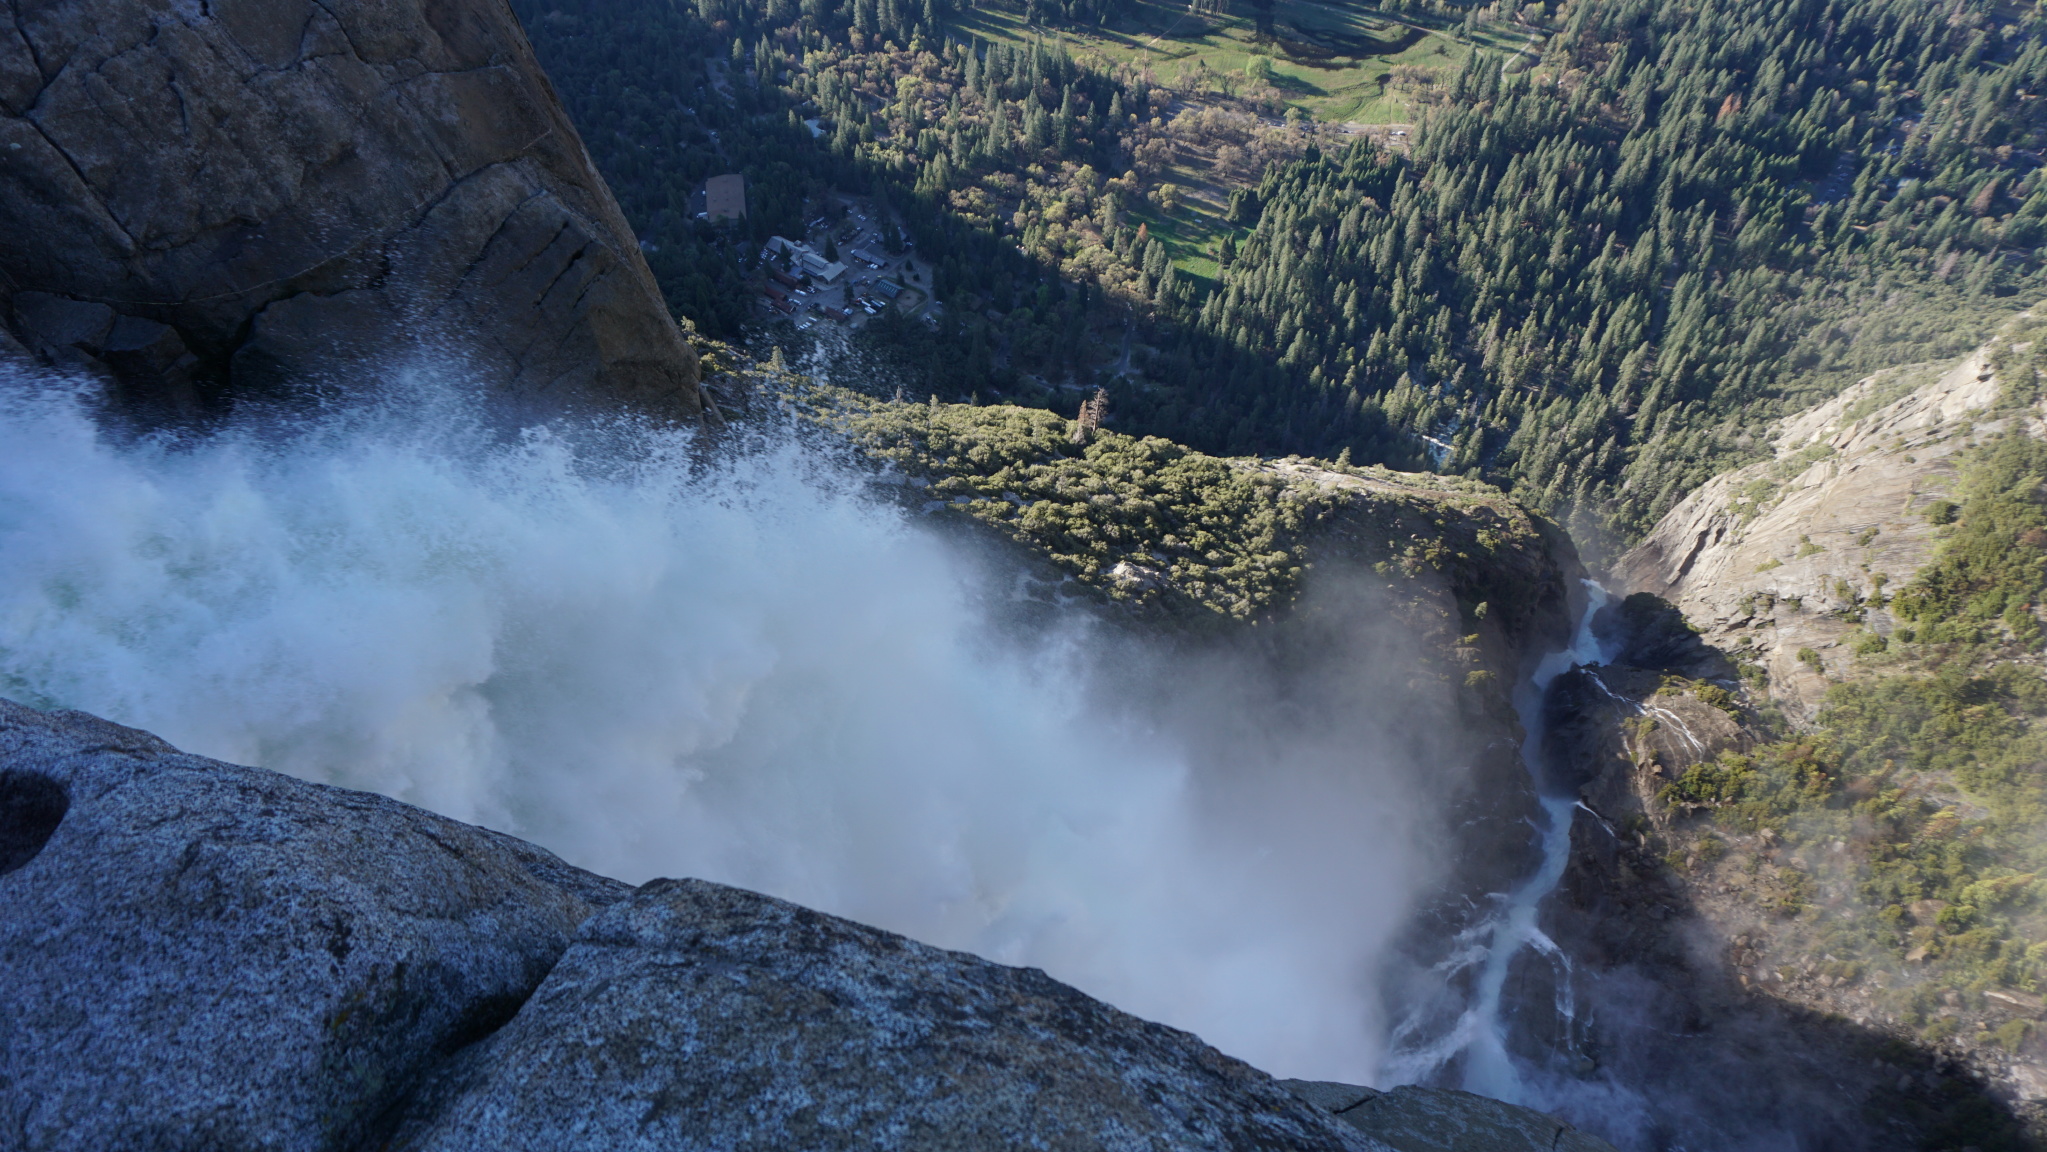
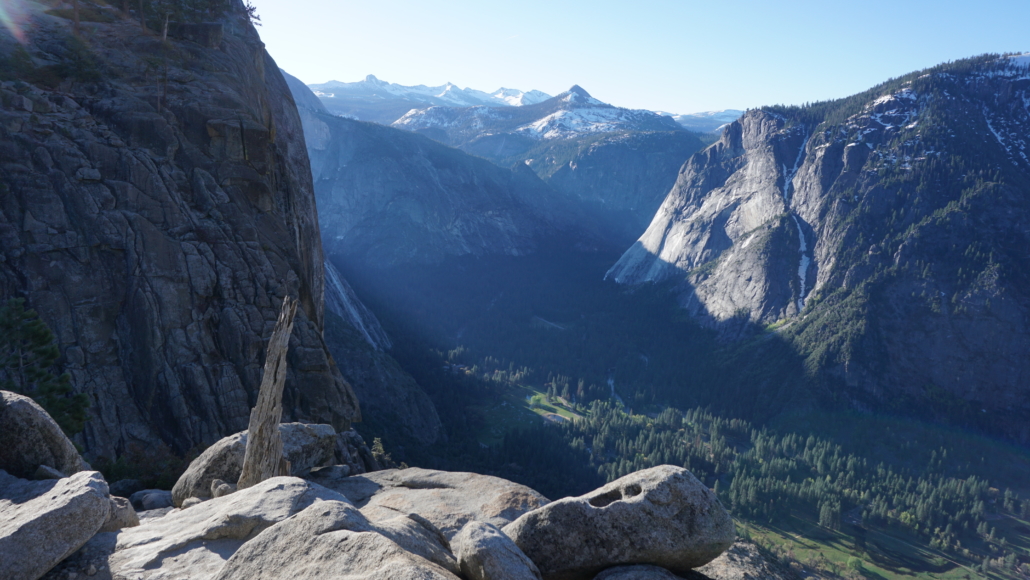
Yosemite Falls from the top-down
You can continue on a steep, sketchy trail with some steep drop-offs to a granite platform overlooking Yosemite Falls from top to bottom. This is an astonishing sight, but it’s not one for people with a fear of heights. You can peer over the edge and see the entirety of Yosemite Falls from a unique vantage, provided such a situation doesn’t make you wish you had some Ativan. Even if you don’t go all the way down to the top of the falls, you can still enjoy some impressive views south across the valley toward Sentinel Dome and Glacier Point.
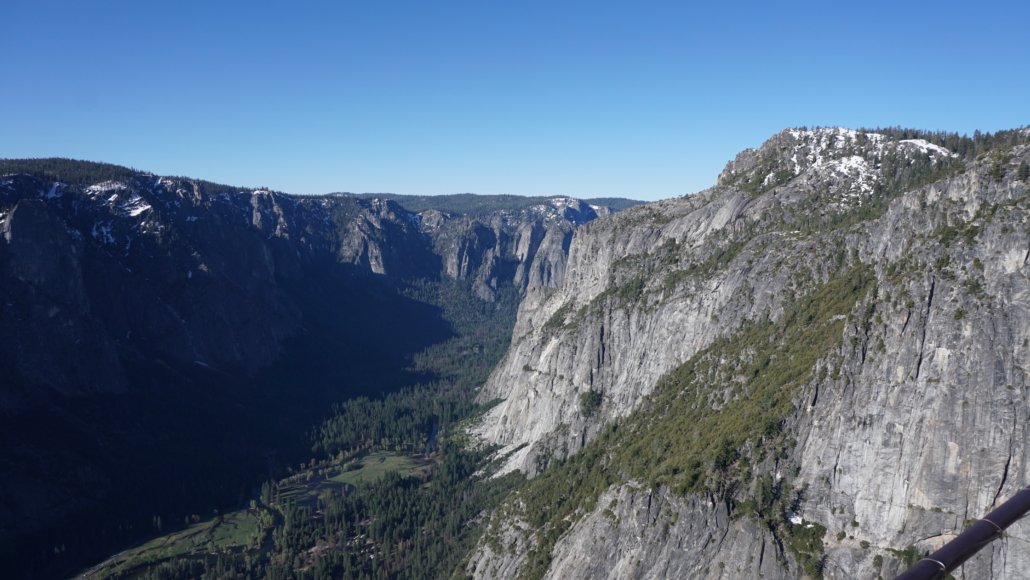
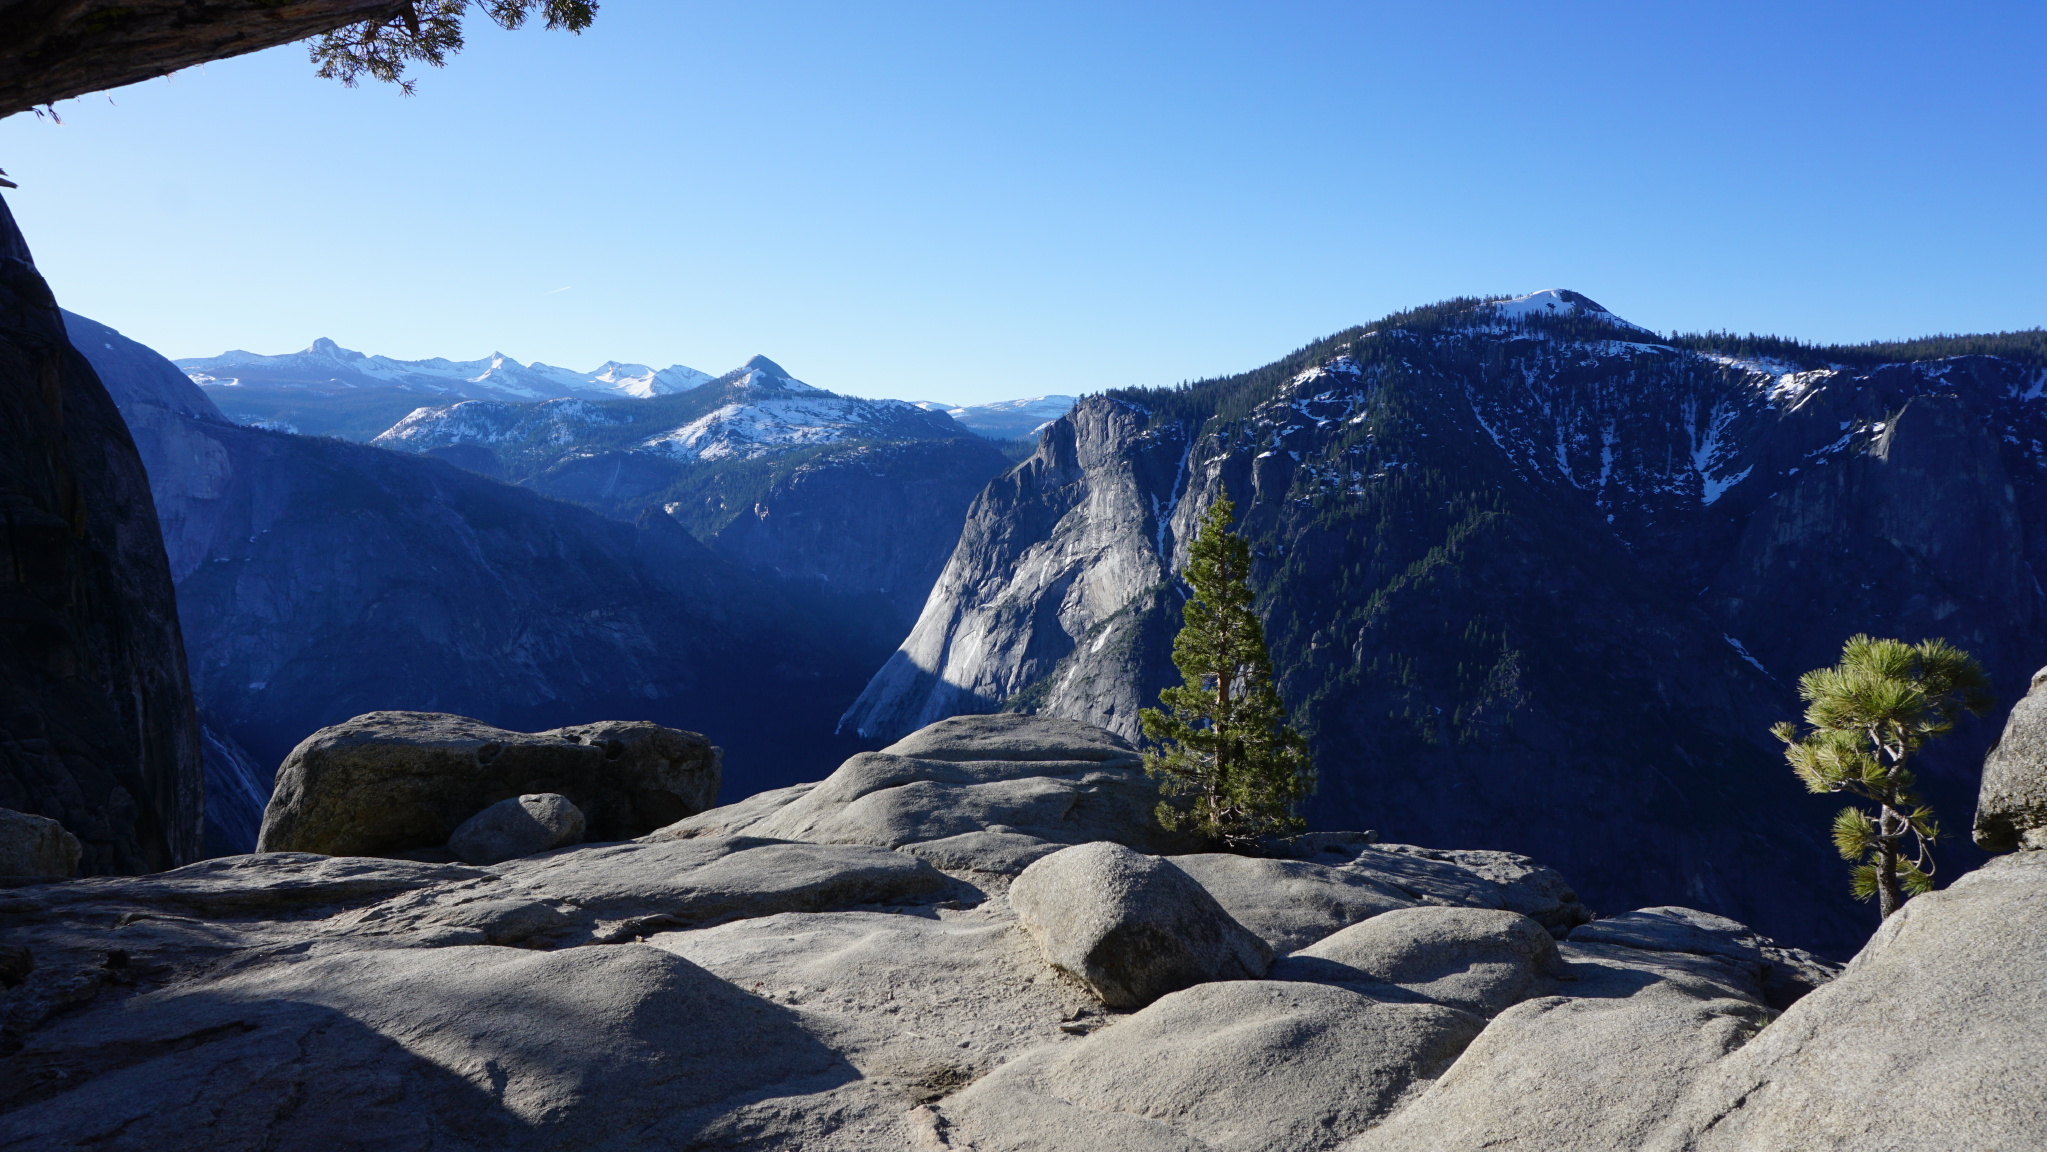
Looking west from Yosemite Point
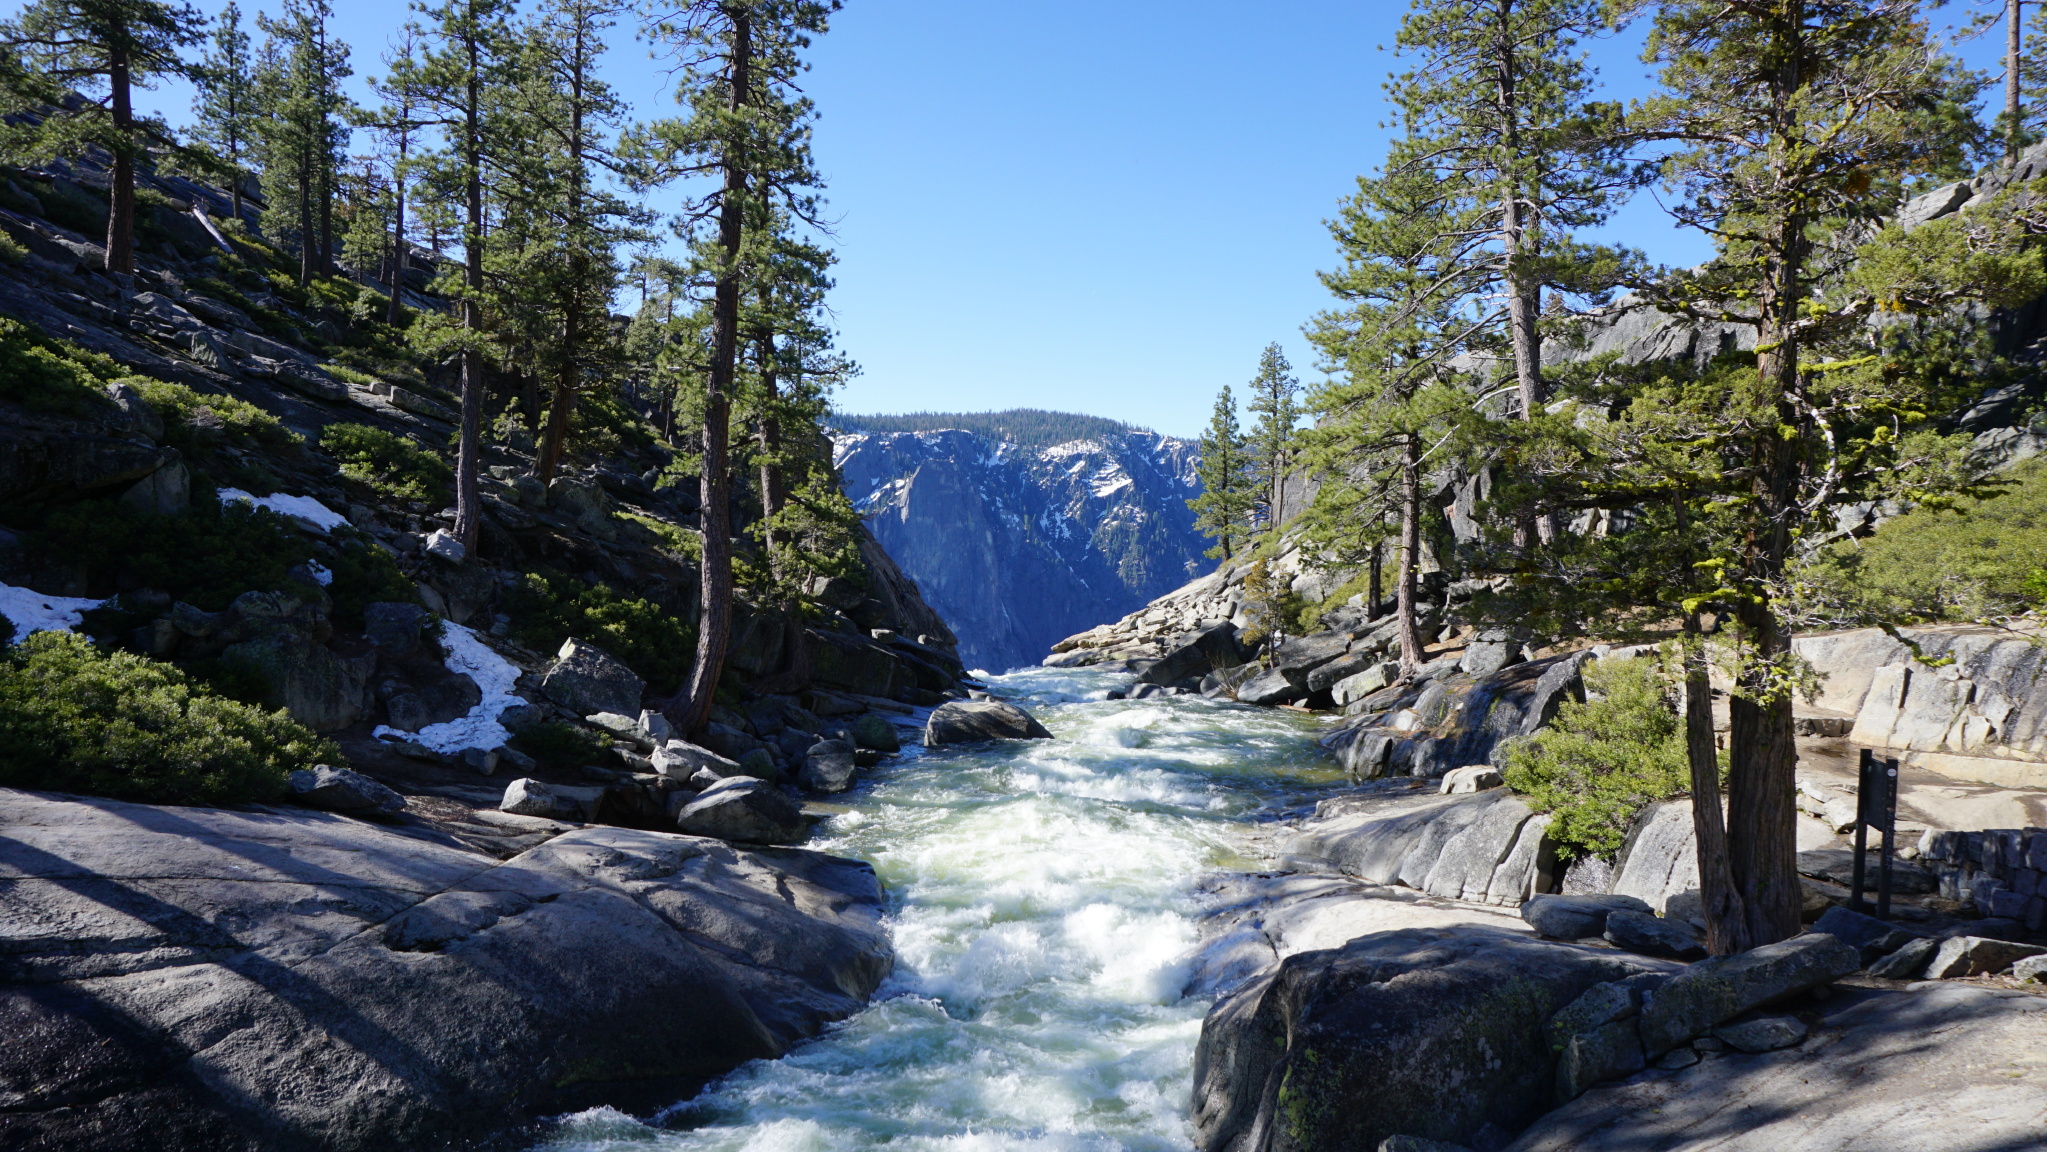
Retrace your steps back on the spur trail to the junction. From here, you can turn back and hike down. Or, if you have the time and energy, you can continue to Yosemite Point, which features soaring views of most of Yosemite Valley. If you’re opting for Yosemite Point, turn right on the trail signed for Yosemite Point. This trail will lead you to the bridge spanning Yosemite Creek, from which you can actually see where Yosemite Creek leaps out into the void. After crossing the bridge, the trail heads north for a short stretch before climbing the slope to your east. A handful of switchbacks help you pick up 350′ of elevation as you climb toward another spur trail leading directly to Yosemite Point at 4.0 miles.
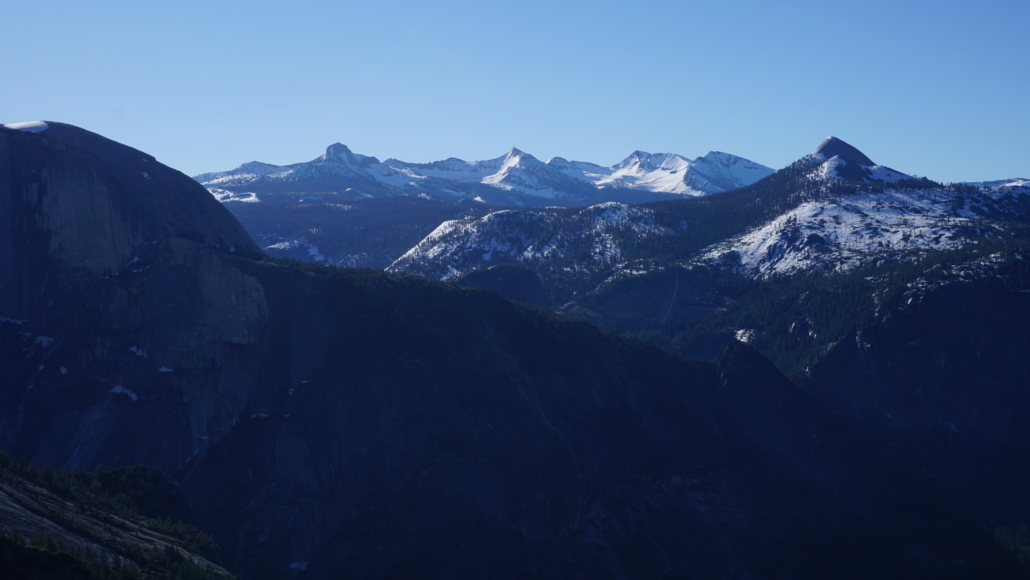
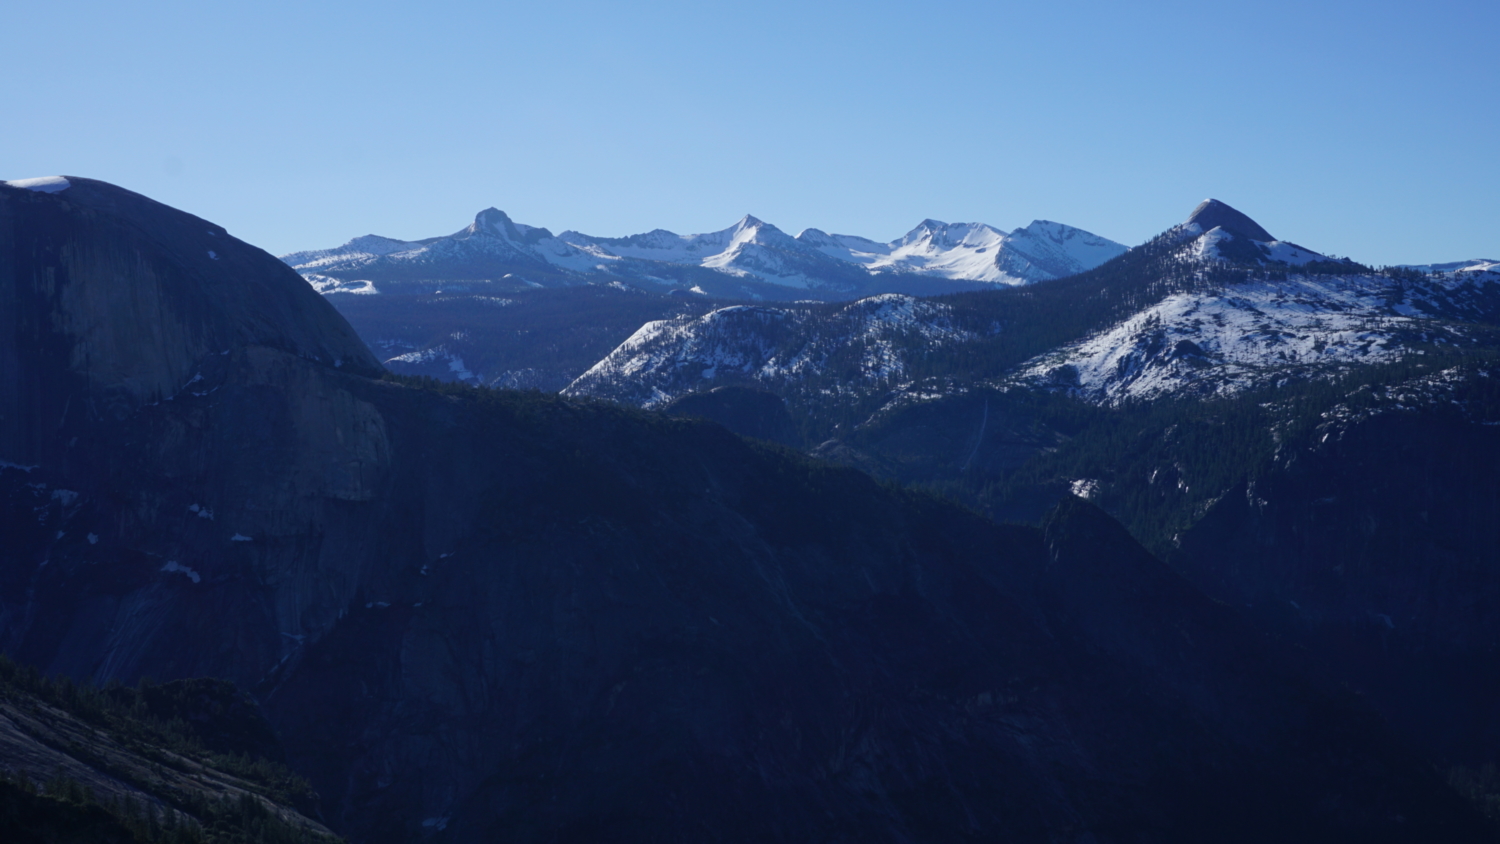
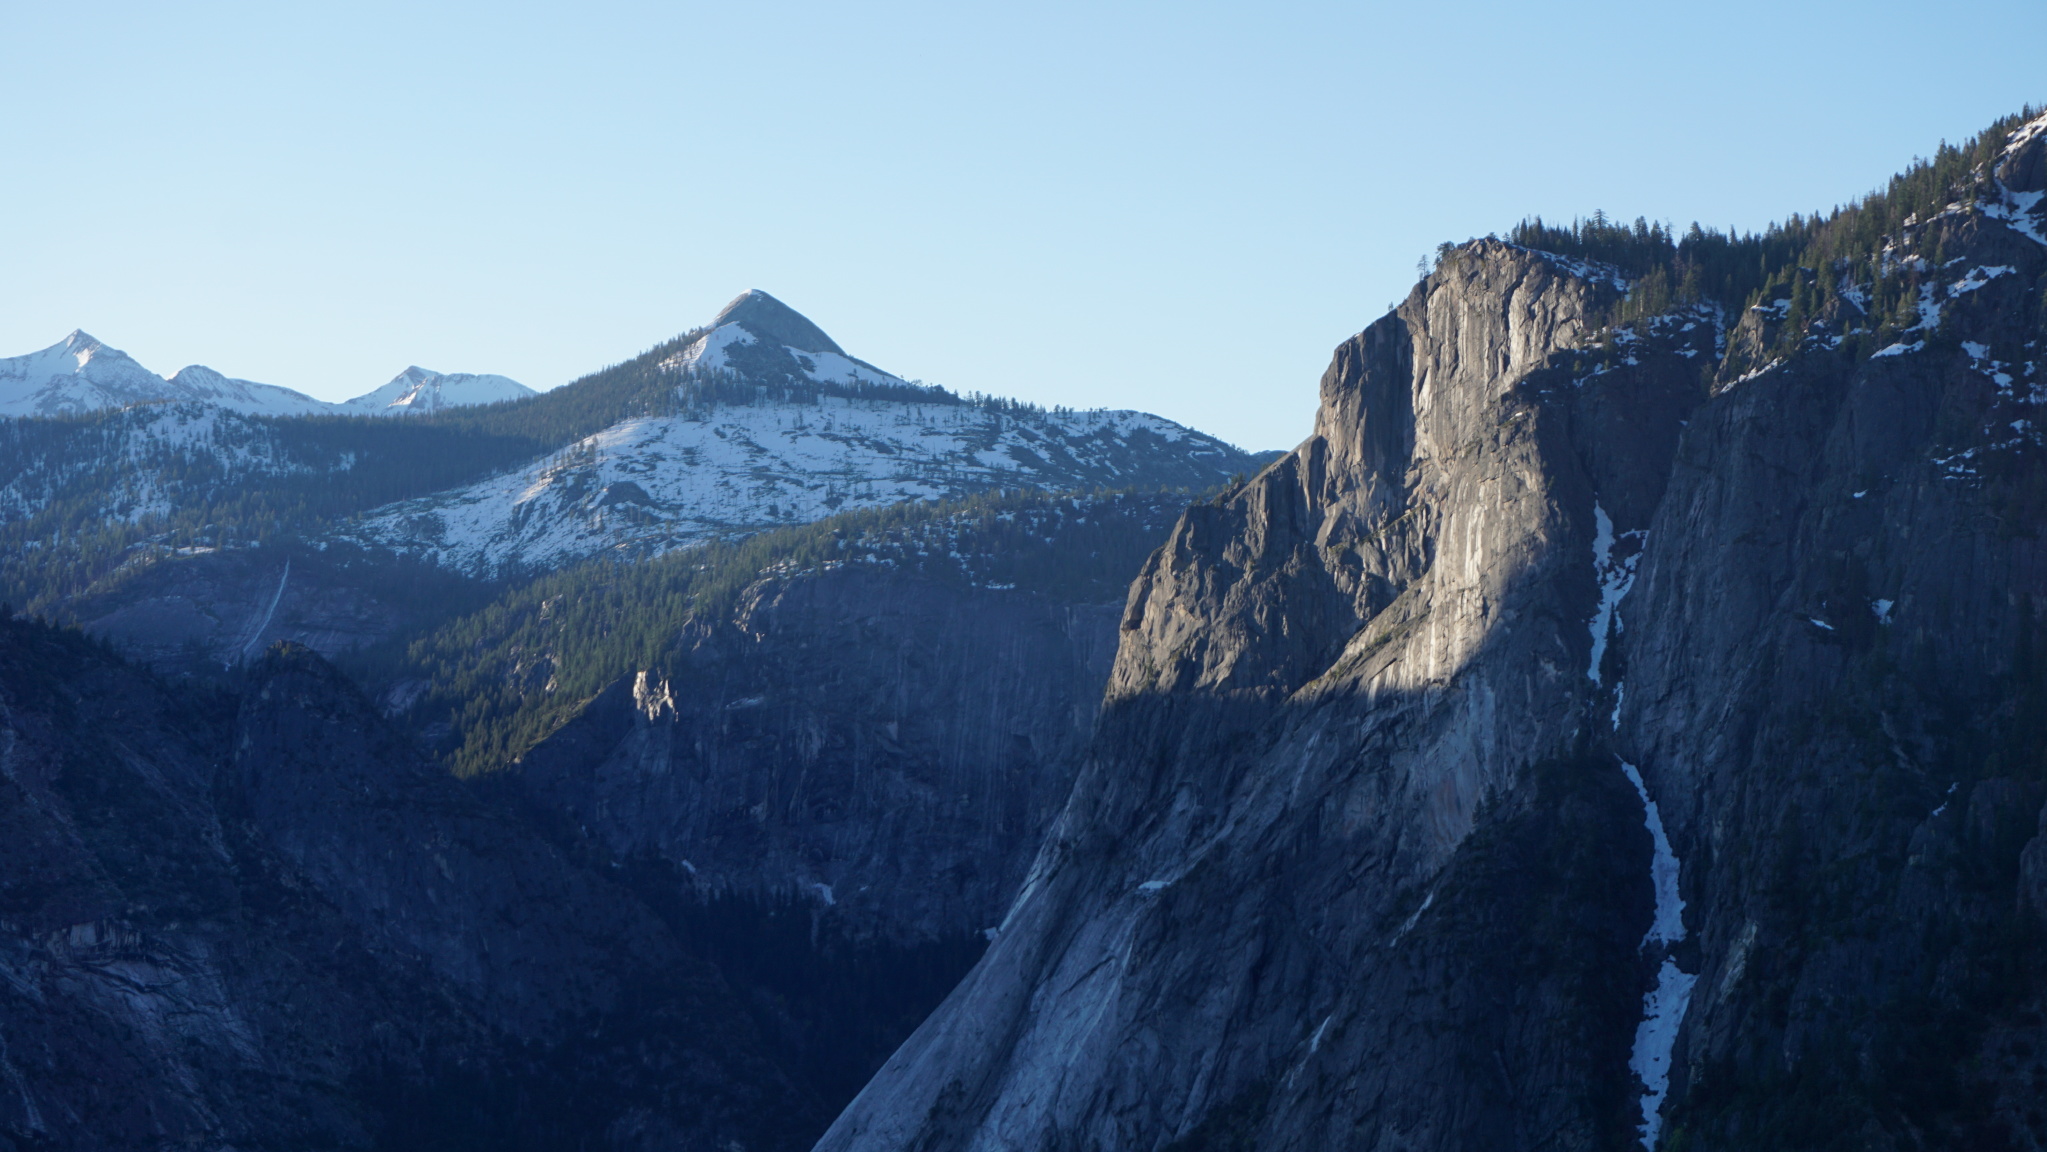
The Clark Range and Mt. Starr King
The true point features a metal guardrail with views somewhat similar views across the valley to Glacier Point. If you want to get the full Monty, cross over a jumble of boulders to the east side of Yosemite Point, from which vantage you can see the famous highlights on the east side of the valley, including Half Dome, Tenaya Canyon, the Clark Range, Clouds Rest, Mt. Starr King, and North Dome. This is a great lunch spot for your hike, and there are camping areas not far from the rim (check with the rangers, and they will direct).

Yosemite Creek just before it leaps into the void.
All that’s left is to descend 3,500′ of elevation back to the valley floor. No biggie, right? Well, the steep grade of the trail and occasionally treacherous footing begs caution, and you may find yourself moving as slowly downhill as you do uphill. You may also be sharing the trail with hundreds of other hikers, and if you follow your trail etiquette, you will need to stop for the uphill travelers. The slow pace is good news for your knees, which may not appreciate the vigorous pounding they’ll receive if you attempt to rush down the mountain.
Tags: Columbia Rock, Middle Yosemite Falls, Upper Yosemite Falls, Yosemite Creek, Yosemite Falls, Yosemite Falls Trail, Yosemite Point, Yosemite Valley